Showing posts with label DIY. Show all posts

Monday, June 24, 2013

Your Go-To for DIY!


Hey there love muffins! I'm Allison and I blog over at Texas Mrs.


I hope you don't mind me taking over Toby's Tails today. But it just so happens that I kinda sorta adore Jaime. There may be a little over 346 things that I enjoy most about her, but let's just cover one of the big ones today. It all boils down to two little words: DIY Projects. 

Over the past couple of years, Pinterest and I have become BFFs.


Pretty much every weekend, I am hitting up Hobby Lobby for my latest needs. And you bet your sweet little heart that I have made some pretty awesome stuff. For instance, this beauty here:
It's completely perfect for the upcoming holiday, amiright?! Speaking of, that just so happens to be my favie holiday of all time. Yes, even more than Christmas. Don't get me wrong, I love celebrating baby Jesus being born. However, there's something about red, white, and blue that makes my heart go pitter patter.

Some other not-so-patriotic projects that I've made are...

+ A cute Mr. & Mrs. sign to hang above my dresser.

+ A cake stand with candle stick and plate of your choice.

Anyways, enough about me. Have you seen the projects that Jaime has made?! They are adorbz.

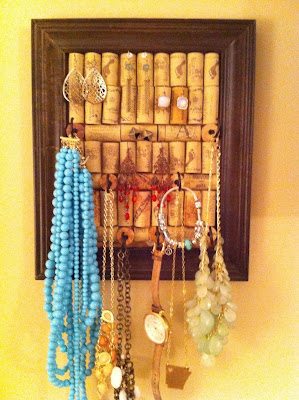
+ This jewelry cork board
(Probably my fav. I may or may not be a wino.)

+ State mugs.
Now that I've sufficiently overloaded you with Pinterest projects ideas, I'll leave y'all alone. But if you ever want ideas, head over to my bloggity blog and see what I'm creating up next. Happy Monday (said no one ever.) Except I'm gonna say it... HAPPY MONDAY!

Linking up for I Love Bloglovin'Monday MinglingThe GFC Collective.

Don't forget to register to win a free teeth whitening kit here!
Follow on Bloglovin

Tuesday, April 2, 2013

Living Space eBook Giveaway


Recently, I've had the opportunity to read an organizational and home decor eBook, Living Space, by Kathryn Weber. I enjoyed it so much that I asked her to share a brief biography about herself and then a little taste of what her book has to offer. Did I mention a giveaway? Oh yeah, if you enjoy her advice, enter the giveaway below for a chance to win a free copy of her eBook.

 
BIO
It started with the recession of 1990 when I was a newlywed. Growing up with a handyman father (why have concrete poured when my daughter can shovel sand and gravel and we can mix it ourselves?) taught me a lot about how to tackle building and construction. Plus, I was always a nest builder. Combine that with some simple carpentry skills, I felt like I had what it took to flip a house. Within eight months, I had a renovated house and my combined writing and house decorating and construction experience had morphed into a career field.
Today I write about home DIY (decorate-it or do-it yourself) and feng shui – something I’d learned about while living on a desert island in the mid-80’s. What I’ve found is that home is more important than ever. There’s not much that can beat a bed with clean sheets and a good hot meal when the vicissitudes of life whip us around like a dingy on the ocean. Our homes are our anchors and spending time on them pays us back in calm contentment when we return home each day. Home is dear to us and ours. The four walls of our house are more than lumber and gypsum, and the sum total or our material possessions; they’re the exterior walls of our hearts.
 
Organize Your Pantry and Fridge this Spring
I once worked for one of the founders of a large Texas fried chicken chain who became a multimillionaire philanthropist after the chain was sold to a larger national Cajun-style fried chicken chain.  He told me one of the company profitability secrets was to keep inventory low and only store what was needed.  By reducing the amount of stored food items, a lot of waste was eliminated – and waste meant money lost. Good organization in the kitchen saves time and frustration, and in today’s economy, organization is another way to reduce wasted food, and wasted money from re-buying what you already have on hand. 
 The two black holes
There are two areas that become our kitchen’s black holes:  the refrigerator and the pantry. Stuff seems to go in there but doesn’t always come out. Did you know a typical refrigerator has double, triples (or more) of items such as salad dressing bottles crowded in it – sometimes holding as many as ten bottles? 
 I wondered how my own fridge was on duplicates and I found some repeats. Turns out, I’m a mustard freak. My refrigerator had six bottles of mustard.  There were two yellows, one grainy, one brown, one Dijon, and one wasabi.  OK, so I’ve definitely jumped off the mustard ledge.  It was enlightening to take a closer inventory of my refrigerator that, until then, had seemed fairly organized.
And then there was the pantry…..
But it doesn’t have to be like this. Some simple strategies can help reduce the redundancy and increase efficiency and organization.
 Alphabetizing anyone?
 I’ve heard that there are some pantries that are alphabetized, but that seems like overkill.  Instead, corralling like items together is the best way to organize a pantry.  Items like baking, snacks, cereals, canned goods, and storage items should be placed together.  I like to put large storage products, such as paper towels and napkins, large juice bottles or soft drinks on the lower shelves. 
 To corral all the little bags of chips and snack items that go into school lunches or for snacking, try using baskets or a low-sided tub on a low shelf.  My favorite shape for storage containers is square and my favorite color is clear.  Opting for square, clear containers to corral bags of beans, rice, pasta, chips and other foods will keep the pantry organized with all the items easy to see. (http://www.ikea.com/us/en/catalog/products/S49871676/)
The same is true in the refrigerator.  Everyone has small packages of items in the freezer, and a small, clear basket is an easy way to keep all those little items together and not falling down to the bottom of the freezer baskets or falling out of the shelves and onto the floor when you open the door. (http://www.organizeit.com/iris-plastic-mesh-storage-baskets-clear.asp#)
Taming the fridge
Make a habit of placing items on the same shelf time after time, such as dairy or jams.  Purchase one nice set of clear plastic or glass food containers (http://www.rubbermaid.com/Category/Pages/ProductDetail.aspx?Prod_ID=RP091260&CatName=FoodStorage) .  That way, when you have leftovers, you’ll be able to find them.  Don’t be tempted to reuse a margarine tub to put your leftovers in because you won’t see them, you won’t eat them, and they’ll grow into an unrecognizable life form that will cause you to wonder what has died in the refrigerator. 
Don’t be afraid to put organizers in the refrigerator and freezer, either (http://pinterest.com/pin/139400550935456701/   or(http://pinterest.com/pin/260364422179747754/).  These can double as drawers and help you from overloading other areas, such as vegetables drawers that, when overcrowded with too many items, festers into a moldy, rotting fridge soup. Lastly, rather than throwing away old placemats, use them to line your vegetable and meat drawers. When they’re dirty, you can just toss them in the wash.
Keep a list
Another key to keeping your refrigerator and pantry organized?  A good grocery list. Make one up of all the items you use and buy regularly and make sure you keep it handy so you can jot down items when you run out.  This way, when you go to the grocery store, there’s no guessing about what you need. 
Take the list in hand before going to the grocery store and look in your pantry and fridge to make sure you write down what you need, but perhaps most importantly, you’ll know what you have on hand already so you won’t waste money buying that eighth bottle of mustard or sixth bottle of salad dressing. To help you with what goes on the list, try painting the back of your pantry door with chalkboard paint to help you write, on the spot, exactly what you need, and that will help you fill out your list more accurately.
Like what ideas Kathryn had to share??? This is just a taste of what her eBook, Living Space, holds. For a chance to win a free copy of her eBook, enter the giveaway below. (Winner will be verified.)

If you just can't wait to see if you've won, you can buy her eBook on Amazon here.


 Linking up with Just Because and Anything & Everything

post signature

Thursday, March 21, 2013

DIY State Coffee Mugs

 Toby's Tails
<div align="center"><a href="http://tobystailsblog.blogspot.com" title="Toby's Tails"><img src="https://blogger.googleusercontent.com/img/b/R29vZ2xl/AVvXsEg7rCTM00Caf5jYePCix-2bG-aI067Mg8xwC6mceCmXMxx9AS2MD3pZjcBCkrkY_yl-qedeXcoXVSF6pNXrza_FVe7eQDx55kU1zPlZEiKqg9my_BqqbPTBkOcuX8PnHX5WFdOtLWbPx5iv/w497-h373/2013-02-26" alt="Toby's Tails" style="border:none;" /></a></div>


Long overdue, but here it finally is..an easy, cute coffee mug DIY.
 
Supplies:
 
Red fine point oil based sharpie
Black fine point oil based sharpie
Two matching porcelain coffee mugs (Target/TJ Maxx)
Paper, double-sided tape, scissors
 
1. This is optional, but Lenae and I found it was easier to do this than free-hand. We printed outlines of our respective states, cut them out, and taped them to our mugs.
 
2. Draw around the paper outline with the black sharpie to create your state outlines. Pull the paper state outline off the mug.
 
3. Using the red sharpie, draw a heart in the area where you live and where the receiver of the other mug lives.
 
4. Draw little red or black dots in the form of a line from one heart to the other.
 
5. Write "Miss" and "You!" on the inside of the mugs.
 
6. Optional: turn the mugs around and draw the opposite state on the other side of each mug, connecting the dotted lines to the back side of the mug. Now the mugs don't have to be together to get the full effect.
 **Note: if you mess up drawing with the sharpie, simply wipe off with nail polish remover.**
 
7. Put mugs in the oven at 350 degrees for 45 minutes.
 
Voila! You're done! I would handwash your mugs for the first couple washes just in case the sharpies don't stay.


post signature


Tuesday, March 12, 2013

DIY..in my Bedroom???


I was blessed enough to be given a pre-made headboard. I used to have red, gold, and black decor but wanted to change things up a bit. The headboard I was given (below) was red and gold.

 
Since I already had the headboard, all I had to do was reupholster it. If you don't have a pre-made headboard, the first thing you will need to do is buy a piece of plywood or other suitable board. Cut it so that it has legs, cover in foam (which you can purchase at Joann's), and then begin with where I began.

 
I lucked out at Joann's. I found this suede upholstery on sale for $24.99 a yard. They only had about a yard and a half left, so they just charged me for the yard. On top of that, my dad and I found a strip of "every fifth hole" nail trim at Joann's for about $20.
Nail Head Trim - Every Fifth Hole
Basically, all you do once you have the supplies, is pull the fabric tight- not super tight, but still tight. With an industrial staple gun, staple down the fabric to the back of the headboard. With the nail trim, just place it in the line you want it to go in. Take one of the nails (it's provided in the package of trim) and hammer it into the hole in the trim and into the board. It's as easy as that.
 
 
I would have taken step by step pictures of the process, but this was a project done prior to Blop the blog. Sorry ladies.
 
One final little piece I wanted to show you before I peaced out for the day...
 
*Tillie-the photo bomber*
 
I saw this baby bombay chest at TJ Maxx with a ticket price of $299.99. Well, of course I had to inspect it (ALWAYS inspect your furniture from TJ Maxx). I found that one of the back legs had been broken off and glued back on. I went and spoke with the sales associate and ended up with new chest of drawers for $149.99. Isn't it adorbs?! (Dad even permanently fixed the broken back leg).
 
Well ladies, that's all I've got for today's Take a Tour Tuesday!
 
Just Because link up with Northern Belle Diaries


post signature

Thursday, February 28, 2013

Thursday Thoughts- DIY Memo Board

 
 Toby's Tails
<div align="center"><a href="http://tobystailsblog.blogspot.com" title="Toby's Tails"><img src="https://blogger.googleusercontent.com/img/b/R29vZ2xl/AVvXsEg7rCTM00Caf5jYePCix-2bG-aI067Mg8xwC6mceCmXMxx9AS2MD3pZjcBCkrkY_yl-qedeXcoXVSF6pNXrza_FVe7eQDx55kU1zPlZEiKqg9my_BqqbPTBkOcuX8PnHX5WFdOtLWbPx5iv/w497-h373/2013-02-26" alt="Toby's Tails" style="border:none;" /></a></div>

Alright ladies! It's our first ever link up party! Grab a button, follow the hosts, link up, and meet some new peeps!


So, Lenae and I were looking at blogs and came across The Kinch Life and her memo board in her office. We decided to make one for Lenae's apartment this weekend. It was the easiest DIY project ever.
 
Supplies
 
1 picture frame-size of your choice
thumbtacks
clothespins
hemp string
hot glue gun/glue
 
Steps
 
1. If you buy a frame with a picture already in it...take it out or cut it out depending. Start with an empty frame.
 
2. Take the hemp string and tie a knot at the end. Use a thumbtack, stick the thumbtack through the knot, and into the side of the frame.
*note that Lenae's frame had a fabric frame inside the wood frame*
 
3. Lenae didn't want the string to be straight across, so she angled each one. It's up to you how you want your memos to hang. Make sure you push each string and thumbtack in before hot gluing them.
 
4. Again, before hot gluing them, consider if you would like to put any other items on the string. Lenae found some cute buttons at Joann's Fabrics and some even cuter paper clips. She hooked the paper clips into the buttons and then slid the buttons on the hemp.

5. Hot glue the thumbtacks into the frame to ensure they don't pull out under the weight. If you've added any buttons like Lenae did, hot glue those too. Once the hot glue dries, add the clothespins and your memos.


Voila! You're done! So easy!
 
What are you're Thursday Thoughts! Link up with Jamie and I every Thursday and write about anything you want while still being able to network with other bloggers. :)


post signature
GYBNEW2